El videoscribe, doodle, videoscribing, o whiteboard animation es un formato de vídeo animado en el que lo gráficos se van creando en vivo sobre una superficie blanca, mientras que en pantalla vemos la mano que los va dibujando. Es una forma de explicar una historia con una narrativa visual muy potente.
Este proceso se puede hacer de varias formas, dependiendo de tu presupuesto. Si no vas muy sobrado existen varios programas en el mercado que simulan el proceso de dibujo de la mano, aquí no os puedo ayudar porque no sé muy bien como funcionan. Diría que en algunos de estos programas las ilustraciones que podemos utilizar son exclusivamente las que estas aplicaciones proponen, es decir no podemos realizar el proceso con material original creado por nosotros. Mientras que en otros programas se simula el movimiento de la mano y la creación del trazo, pero de una forma muy poco sutil, de manera que el resultado es muy artificial.
Entonces, partiendo de la base de que estos vídeos siempre los hago con ilustraciones creadas por mi, voy a explicar un poco cual sería el proceso:

0.Guion.
El cliente nos facilita el guion a partir del cual empezaremos a trabajar. Este texto será el que acompañará a las ilustraciones que se irán creando en pantalla. Lo primero que hacemos es locutar el texto para saber la duración total del vídeo y más concretamente de cuánto tiempo disponemos en cada escena. Este proceso lo haremos con una aplicación de AI (yo uso Speechgen). Esta locución provisional la sustituiremos más adelante por la definitiva, la humana.
1. Separación de escenas
y conceptualización.
A partir del contenido del guión realizaremos la separación de escenas, explicando (por escrito), que aparecerá en pantalla en cada momento, y como se representará de forma gráfica lo que se está locutando. Este proceso de conceptualización lo puedo proponer yo, o ya venirme dado para la agencia y el cliente.
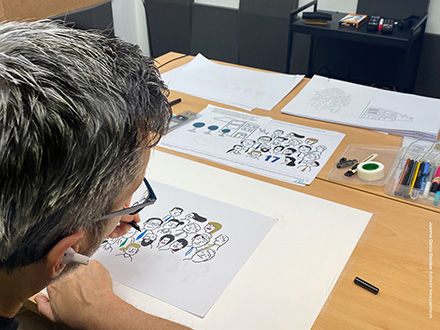
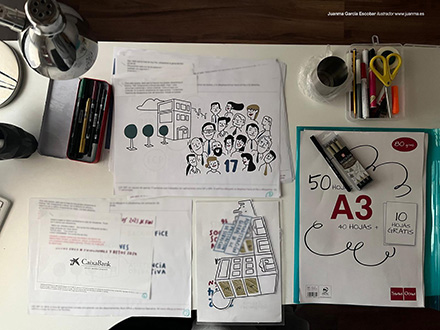
2. Story
Una vez aprobadas las escenas
y lo que vamos a explicar en cada una de ellas, prepararemos un story con las ilustraciones que posteriormente dibuja--remos en tiempo real. Hasta aquí el proceso de trabajo es el mismo que utilizamos en la creación de un motion graphics o un vídeo animado en 2D. A partir de este momento el resto del proceso es muy diferente.
Hagamos aquí una pausa para explicar algo más. El story que crearemos y que después dibujaremos lo podemos hacer, si así se consensua previamente, en formato vectorial. De esta forma, podremos entregar todo este material al cliente para su uso en otros formatos, fuera del vídeo. En lo que se refiere a la cesión de derechos, normalmente en los gráficos generados se ceden para su uso dentro del vídeo o para la promoción del mismo. De forma que si se entrega todo material en formato vectorial, de debería realizar una ampliación de estos derechos que incluya su uso en el territorio y periodo temporal que se pacte con el cliente.
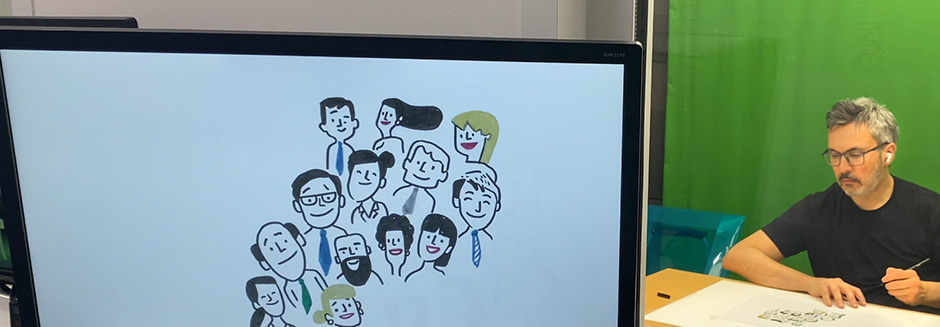
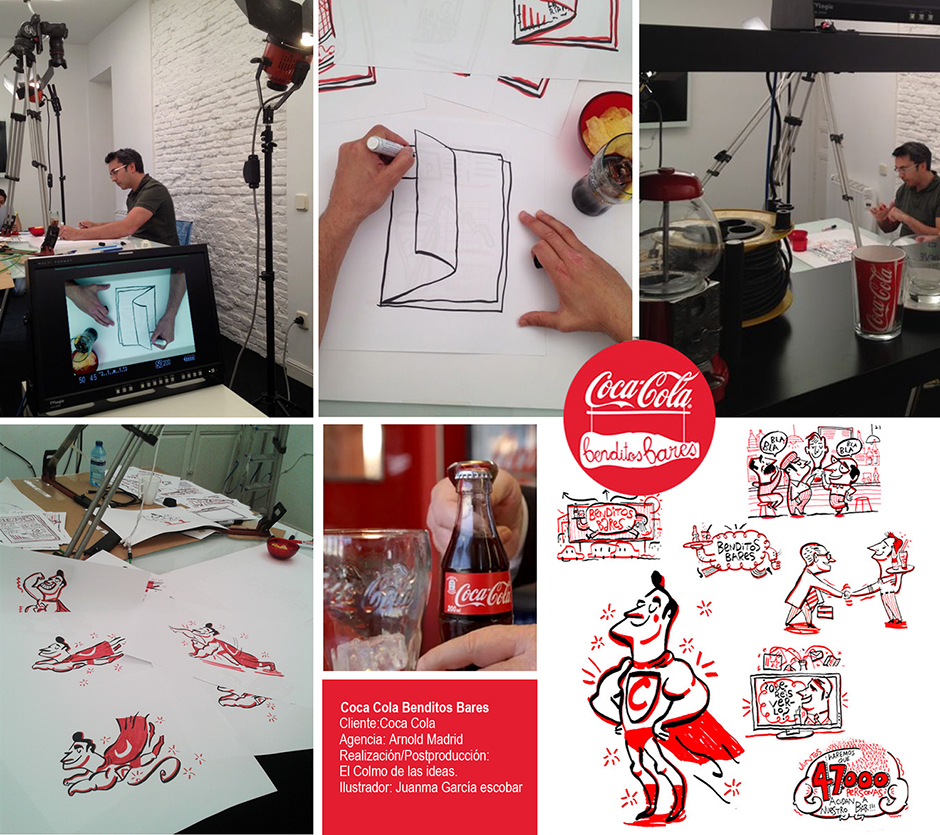
3. Grabación
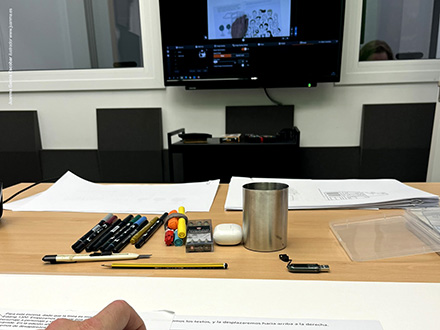
Una vez aprobado el story, procederemos a dibujar lo mismo en tipo real. Para ello nos desplazamos a un estudio de grabación que con cámara cenital registre todo el proceso. Es interesante realizar la grabación con una resolución muy alta (4k si es posible), para poder escalar la imagen durante la edición si es necesario. Necesitaremos aproximada-mente una hora de grabación por cada minuto de vídeo final. Por ejemplo para un vídeo de 4-5 minutos será necesaria una jornada de 4-5 horas. Y para no olvidarnos de nada es conveniente llevar una copia a color de cada ilustración, con anotaciones tipo:
-Rotulador a utilizar (grosor, color...)
-Orden de aparición de las ilustraciones, es decir, por donde empezamos a dibujar. Esto es importante en muchas escenas para seguir los tiempos de la locución.
4. Edición y sonorización
Ya tenemos la grabación. Ahora montaremos el vídeo con todas las escenas acelerando la velocidad más o menos de cada una de ellas de forma que encajen con la locución. Aquí añadimos música, efectos de sonido, etc...y ya tenemos el vídeo listo.
Otras cosas a tener en cuenta:
Colores.
Lo más complicado en la grabación de estos vídeos es conseguir minimizar la sombra que la mano proyecta sobre el dibujo.
Jugando con la iluminación y la edición posterior podemos reducirla. Realizando el vídeo solo con color negro, todo este proceso es muy más sencillo, pero al utilizar el color, la sombra que proyecta la mano puede hacer que varíen ligeramente los tonos con lo que el efecto visual de la mano acelerada junto con estos cambios de tono no es muy agradable. Por eso recomendamos realizar esto vídeos con una gama de colores muy corta, y si es posible solo con color negro.
Animación 2D
Me gusta introducir algo de animación 2D. Por ejemplo que la mano dibuje a una persona y que una vez haya acabado chasqueé los dedos y esa persona dibujada empiece a moverse o a hablar...recursos de este tipo enriquecen mucho el resultado. Del mismo modo llevar a la grabación elementos "predibujados y recortados" y que mano en lugar de dibujarlos los arrastre al escenario.
Elementos reales.
Queda muy bien en este tipo de vídeos introducir algún elemento real en la grabación. El dibujante se puede estar tomando un café o un refresco, o podemos añadir un cubo con los rotuladores que se están utilizando. Este recurso en todavía más efectivo cuando tiene algún sentido y está relacionado con el tema que estamos trabajando en el vídeo. Por eso es un aspecto a valorar con el cliente, en el inicio del proceso de trabajo.
Mano con camisa.
La mano aparecerá continuamente en la pantalla con lo que si el hecho de llevar o no camisa o algún otro elemento añadido es importante, se debe saber obviamente antes de realizar la grabación.
Plazo de entrega Para un vídeo de unos 3-4 minutos: Entre 2 y 3 semanas, en función de la rapidez del feedback y las rondas de cambios.
Presupuesto Este formato no es barato. Partiendo desde un mismo guion e idéntica conceptualización y separación de escenas, podemos hacer un vídeo animado en 2D/motion graphics o un videoscribing. Pues bien, el sobrecoste de optar por el videoscribing, para un vídeo de 3-4 minutos puede ser de un 20-25%, sobre el precio que cobraríamos por la animación en 2D.
-----------------------------------------------
Videoscribe, doodle, videoscribing, or whiteboard animation is an animated video format in which graphics are created live on a white surface, while on the screen we see the hand that draws them. It is a way of explaining a story with a very powerful visual narrative.
This process can be done in several ways, depending on your budget. If you don't have much experience, there are several programs on the market that simulate the hand drawing process. I can't help you here because I don't really know how they work. I would say that in some of these programs the illustrations that we can use are exclusively those that these applications propose, that is, we cannot carry out the process with original material created by us. While in other programs the movement of the hand and the creation of the stroke are simulated, but in a very unsubtle way, so that the result is very artificial.
So, based on the fact that I always make these videos with illustrations created by me, I am going to explain a little what the process would be:
0.Script.
The client provides us with the script from which we will start working. This text will be the one that will accompany the illustrations that will be created on the screen. The first thing we do is speak the text to know the total duration of the video and more specifically how much time we have in each scene. We will do this process with an AI application (I use https://speechgen.io/). We will replace this provisional locution later with the definitive one, the human one.
1. Scene separation and conceptualization.
Based on the content of the script, we will separate the scenes, explaining (in writing) what will appear on the screen at each moment, and how what is being said will be graphically represented. This conceptualization process can be proposed by me, or already provided for the agency and the client.
2. Story
Once the scenes and what we are going to explain in each of them have been approved, we will prepare a story with the illustrations that we will later draw in real time. Up to this point, the work process is the same as that used in creating motion graphics or a 2D animated video. From this moment on the rest of the process is very different.
Let's pause here to explain something else. The story that we will create and then draw can be done, if previously agreed upon, in vector format. In this way, we can deliver all this material to the client for use in other formats, outside of video. Regarding the transfer of rights, normally the generated graphics are transferred for use within the video or for its promotion. So if all material is delivered in vector format, an extension of these rights should be made to include its use in the territory and time period agreed upon with the client.
3. Recording
Once the story is approved, we will proceed to draw the same in real type. To do this, we went to a recording studio that uses an overhead camera to record the entire process. It is interesting to record with a very high resolution (4k if possible), to be able to scale the image during editing if necessary. We will need approximately one hour of recording for each minute of final video. For example, a 4-5 minute video will require a 4-5 hour day. And so as not to forget anything, it is advisable to carry a color copy of each illustration, with notes such as:
-Marker to use (thickness, color...)
-Order of appearance of the illustrations, that is, where we start drawing. This is important in many scenes to follow the timing of the voiceover.
4. Editing and sound recording
We already have the recording. Now we will edit the video with all the scenes, accelerating the speed more or less of each of them so that they fit with the voiceover. Here we add music, sound effects, etc... and we have the video ready.
Other things to keep in mind:
Colors.
The most complicated thing in recording these videos is to minimize the shadow that the hand casts on the drawing. By playing with the lighting and subsequent editing we can reduce it. By making the video only with black, this entire process is very simpler, but when using color, the shadow cast by the hand can cause the tones to vary slightly, which results in the visual effect of the accelerated hand along with these changes of tone is not very pleasant. That is why we recommend making these videos with a very short range of colors, and if possible only with black.
2D animation
We like to introduce some 2D animation. For example, the hand draws a person and once it is finished, I snap my fingers and that person begins to move or speak...resources of this type greatly enrich the result. In the same way, bring "pre-drawn and cut out" elements to the recording and hand them instead
Hand with shirt.
The hand will appear continuously on the screen, so whether or not wearing a shirt or some other added element is important, you must obviously know before recording.
Delivery time For a video of about 3-4 minutes: Between 2 and 3 weeks, depending on the speed of feedback and rounds of changes.
Budget This format is not cheap. Starting from the same script and identical conceptualization and separation of scenes, we can make an animated video in 2D/motion graphics or video scribing. Well, the extra cost of opting for video scribing, for a 3-4 minute video, can be 20-25% over the price we would charge for 2D animation.
|


